Categories
Education Fun & Entertainment How-To Guides Linux Mac Photoshop Tips and Tricks Windows

How to Rasterize Layers in Photoshop ?

I guess, you might have seen rasterization error in the Adobe Photoshop.

Well, it says, The pixels in a type layer cannot be edited with out first rasterizing the layer or can not complete request due to pixels in the layer type is not able to be edited without earlier rasterizing the layer, as shown in the below figure,

How to Rasterize a Layer in Photoshop?

It was displayed due to the reason that you tried to use the filters or the painting tools on some layer which consists of some vector data in it, for example – vector masks, shape layers and so on.

So you will have to rasterize the layer containing vector data, and use the filters or tools on the same, thereafter.

Rasterization of Photoshop layers is really easy.

To do so, just choose the layer(s) for rasterizing, then visit Layer > Rasterize > Layer.
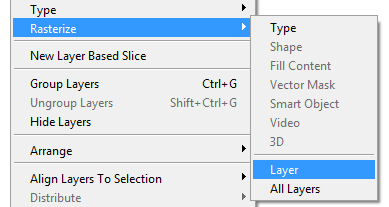
How to Rasterize a Layer in Photoshop?

And here you go.

Enjoy!

Categories
Education Fun & Entertainment How-To Guides Linux Mac Photoshop Tips and Tricks Windows

How to Add Border around an Image in Photoshop

Adding image border in Photoshop is quite easy after following the below steps.

  1. Just launch the Photoshop Software, and open the desired picture in it. Now to select the whole picture area hit CTRL + A (If you wanna add borders to some particular part to that picture, then you can choose the Photoshop Selection Tool).
  2. After performing the selections, visit Select > Modify > Border, and select the size of the border which you want to be created around that photo.

    How To Add a Border Around an Image in Photoshop

  3. Thereafter, select the border color from the Photoshop Color Palette, and visit Edit > Fill, to make the borders.

And you’re done with adding borders.

Enjoy!

Categories
Education Fun & Entertainment How-To Guides Linux Mac Photoshop Tips and Tricks Windows

How to Draw An Arrow in Photoshop

Most of the Photoshop beginners ask about drawing the arrows by using photoshop software.

Well, it is really easy to do so, for that you will have to use a line tool in a following way.

  1. Launch the Photoshop Software, Open the desired image in it, and and create a new layer
  2. Choose line tool as shown below in the picture (from the tool box)
    How to Draw An Arrow in Photoshop
  3. Then just select the Shape Layers, and launch the drop-down menu,
    then choose the Arrowheads as the Start or End. Then arrow head will be drawn to your desired point. Moreover, you can change the weight to 3px or more based on your desire.
    How to Draw An Arrow in PhotoshopHere you go! So you can now easily create the arrows in the Photoshop itself, as shown below in the picture.

    How to Draw An Arrow in Photoshop

Hope you enjoyed the tutorial.

Categories
Fun & Entertainment How-To Guides Mobile Phones Tips and Tricks

Samsung Corby Secrets – Samsung Corby Unknown Secrets

Samsung Corby is a very nice phone from the Samsung Mobile and has got a few unknown and surprising secrets. As they haven’t made public by the Samsung Mobile, we are sharing a few secrets with all of you.

First of all, we will go with the basic secret short codes, and thereafter get into the action.

One can start with some basic secret short codes which are common to all the phones,

  1. *#06# – To display mobile phone IMEI code no. i.e. is International Mobile Equipment Identity code no.
  2. #*7728# – To do master reset. This will set your phone to the default factory settings just like you have bought it at the time of making purchase. Don’t worry it won’t remove anything from your mobile phone, but will .
  3. *2767* 5282# – To reset the Java Application. Please note, this will delete all your Java Mid-lets which – installed on the mobile phone)
  4. *#9998*3323# – To unlock all networks in Samsung Corby

Now coming to some secret codes which may or may not work on all phones but these are working on many Samsung mobile phone models.

  1. *#9998*585# – To show / display the Non-Volatile Memory (NVM) options
  2. *#32436837# – To show / display the Digital Audio Interference On options
  3. *#9999#0# – To show / display a Monitor Mode Menu
  4. *#8888# or *#9998*8888# – To show / display a Hardware Version Menu
  5. *#9999# or *#9998*9999# – To show / display a Software Version Menu
  6. *#9998*5282# – To show a Java Menu, in which we could set the Java Server GPRS or CSD Settings
  7. *#9998*4357# – To show / display a Help Menu where we can select a lot of inbuilt options.
  8. *#9998*842# or *#9998*0842# or *#0842# – To show / display the Vibration On options
  9. *#9998*0523# or *#0523# or *#9998*523# – To display the options for Contrast.
  10. *#0289# or *#9998*0289# or *#9998*289# – To show / display the Buzzer on the options
  11. *#9998*746# or *#9998*0746# or *#0746# – To give the Sim Information.
  12. *#9998*782# – To show / display the date and alarm clock options
  13. *#9998*5646# – To show / display the change operator logo at startup
  14. *#9998*0377# or *#9998*377# – To show / display the Error-logs
  15. *#9998*288# or *#9998*0288# or *#0288# – To show / display the Battery & Field Information.
  16. *#8999*638# – To show / display the network information
  17. *#9998*778# or *#9998*0778# or *#0778# – To show / display the Sim Service table
  18. *#3243948# – To show / display the Digital Audio Interference Off options
  19. *#9998*76# – To show / display the production number
  20. *#9998*968# – To show / display the melody for alarm options

This list will be updated soon with more secret codes. To be updated, you can subscribe to our mailing lists.

Categories
Education Fun & Entertainment How-To Guides Tips and Tricks Windows

How to Use Wikipedia as Screensaver

Although you might have configured nice looking screen-savers on your PC, or used the image slideshows of some actresses/actors as a screensaver. But why not try a different screensaver this time, like using the Wikipedia Screensaver.

Wikipedia Screensaver displays a random page from the large database of Wikipedia at the time our computer system is idle. After a few seconds (Around 30), the page changes to something else, but from the same wikipedia. 🙂

You can configure the default delay time for the Wikipedia Screensaver from its settings.

Basically the Wikipedia screensaver uses the Microsoft Internet Explorer to show up the Wikipedia random pages and uses the full screen mode of Internet Explorer.

But to use the Wikipedia screensaver, one must install the Microsoft .NET Framework 1.1 to their computer system. You can Download the Wikipedia Screensaver from here.

Categories
How-To Guides Linux Tips and Tricks Windows

Play or Open Youtube and Dailymotion Videos in VLC Media Player

Obviously VLC media player is the best rifle to shoot all the media players in the arena.VLC has one more in-built feature which you probably don’t know. You can play YouTube and Dailymotion videos in it.

Open YouTube Videos in VLC Media Player

Yes really!

Its really very easy to play any dailymotion or youtube video in VLC media player.

For example :

  • Execute the VLC Media Player installed on your system.
  • Hit CTRL + N
  • Paste thishttps://www.dailymotion.com/video/xgw71x_lithuanians-plan-all-blonde-resort_news#hp-v-v3

    in the Text Box provided, as shown below
    img5

Now Click on the Play button, and here you go. It will start playing the video of Dailymotion.

You can play the youtube videos in the same way. Just paste the youtube video URL in this text box, hit enter, and it will start here itself.

You can also stream many kind of medias with the VLC Media Player.

Enjoy!