Categories
Facebook How-To Guides Security Tips and Tricks

How to download Your Facebook Profile, Wall Posts, Photos, Videos and Notes backup on the PC ?

Thanks to Facebook that after a long time, it has provided the method to backup all your facebook account as a zip file (including Wall posts, Messages, Photo Albums, Videos, Notes and all which we shared on our facebook profile).

To download the back-up of your Facebook Account, go to Account > Account Settings > Settings > Download Your Information.

Facebook Account Settings

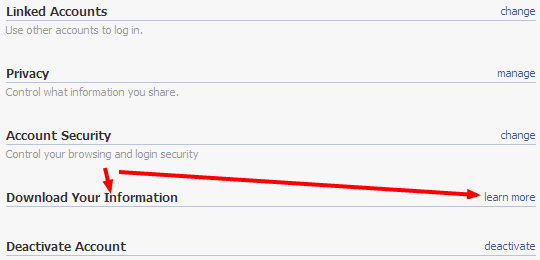
Click on “learn more” link in front of it. After confirming for the back-up, you will see a pop-up message as following.

Facebook Account Information Downloading and Backup

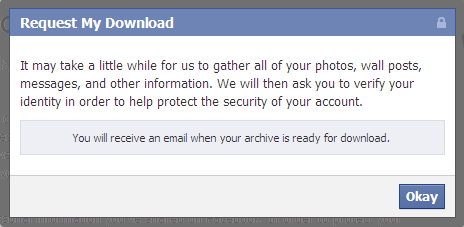
Once your back-up gets completed you will be sent an email notification about it. This takes some time, depending upon the number of posts or data in your faceboook account. It took 35 minutes to us to get that notification, in our test data (around 23 MB).

Enjoy!

Categories
Computer Home How-To Guides Security Tips and Tricks Windows

How to Use Bluetooth Proximity To Lock And Unlock Computer ?

Well Windows Locking is a nice feature presented by Microsoft.

According to this feature, if you are working on a Windows based Operating System, you can lock your PC by pressing Windows Key + L. But what if you need to lock your computer from some distance.

Imagine you are not at your office and suddenly it came in your mind that you forgot to lock your computer, what to do then?

Will you go back there and lock it?

Nopes! There no need to go there.

You can remotely lock your computer using any bluetooth enabled mobile phone handset and a bluetooth device attached to PC.

Bluetooth Proximity Lock (BtProx) is a nice software which locks the Windows Operating System – computer if it gets disconnected from the bluetooth area range, and again gets unlocks when you come back in that range.Use Bluetooth Proximity To Lock And Unlock Computer

You can also specify some command to locks or unlocks the computer.

You can download BtProx from here.

Categories
Computer Facebook How-To Guides Security Tips and Tricks

How to Save Facebook Chat History to Read that Later

Update : Now facebook stores each and every chat in the history as messages.

You can get the chat history by clicking on Message button on the desired profile page.

You can use desktop chat clients to save Facebook Chat History. Two most popular clients are Digsby and Chitchat.

or if you are using Mozilla Firefox Browser, then you can install Facebook Chat History Manager plugin add-on.

Just visit the Mozilla Firefox addons page to install that plugin and hit the Add to Firefox button. After you have installed the add-on(s), you will be needed to restart the Mozilla Firefox.

Now visit Tools > Get Facebook ID. If you are signed-in to the Facebook Account, it will open the Facebook Chat History Manager application, and ask you to provide permissions to it. Hit the Allow button.

If you’re not signed in, then you’ll be needed to sign-in to your Facebook account and provide access to it. Once you’ve done that, a dialog box will appear displaying your account’s Facebook ID. Copy that ID in notepad (This will be required later).

How to Save Facebook Chat History to Read it Later

Now visit Tools > Facebook Chat history Manager > Create Account.

Paste the copied Facebook account ID, and set a difficult password, which will be later used to access logs of your Facebook chat history.

Now all your chat history of Facebook will get saved and if you want to read them in future, just hit a combination of CTRL + ALT + F, and write the your Facebook credentials.

Here you go. An example is given below.

How to Save Facebook Chat History to Read it Later

Categories
Computer How-To Guides Security Tips and Tricks Windows

How to Delete Skype Call And Chat History ?

Just like the other IM Chat clients, Skype is also keeping up the logs for all of your calls and chats. It records every voice calls, video calls, conversations, sms and file transfers.

All of the details are available at a click away from you, i.e. the Show History Link Button.

If you are worried about the privacy policy, then you can delete all the calls and chat history from Skype, from time to time.

Here’s the method for doing it,

Just launch skype and then visit Tools > Options.

Choose the Privacy tab from left menu. Now look for the Clear History, as displayed below.

How To Delete Skype Call And Chat History

And click on Clear History.

An alert box will confirm deleting and all the history present in skype (on your computer system) will be deleted.

Enjoy!

Categories
Computer Education General Home How-To Guides Laptops Mac Mobile Phones Security Tablet PC Tips and Tricks Windows

How to Lock The Taskbar Permananetly in Windows ?

We always lock the taskbar by the below displayed method,

How To Lock The Taskbar Permananetly in Windows

but if someone else changes it on our own computer, we get irritated, and want something like, to hide the lock the taskbar button, so that no one else could change your preference.

And yes, there a way to do so.

First of all apply all the desired changes on your windows taskbar. Now right click anywhere on the taskbar and hit Lock the Taskbar.

How To Lock The Taskbar Permananetly in Windows

Then perform the below steps,

  1. Go to Start > Run, enter regedit and hit the OK button.
  2. Look for the key,
    HKEY_LOCAL_MACHINE\Software\Microsoft\Windows\CurrentVersion\Policies\Explorer
  3. Create a new DWORD Value by right clicking anywhere in the pane, as,  New > DWORD Value. Now create a LockTaskbar key.How To Lock The Taskbar Permananetly in Windows
  4. Then open the newly created entry by double clicking on it and set the Value of it as 1.How To Lock The Taskbar Permananetly in Windows
  5. Exit the regedit – registry editor.

And you’re done.

To confirm, right click on the windows task bar and you’ll see that Lock the Taskbar is disabled.

How To Lock The Taskbar Permananetly in Windows

This trick is applicable to the current logged in user. If you have several user accounts, you have to do this procedure separately for all of them. So, to get rid of this and apply this as global setting (for all users on the computer), you will have to create LockTaskbar key (as explained above), in this

HKEY_LOCAL_MACHINE\Software\Microsoft\Windows\CurrentVersion\Policies\Explorer

In future if you need to edit the taskbar settings, just reset the value of the LockTaskbar key to 0 (which was set to 1).

Categories
Computer Education General Home How-To Guides Laptops Mac Mobile Phones Security Tablet PC Tips and Tricks Windows

How to Stop Annoying Balloon Tips in the Windows Notification Area ?

No one likes the annoying balloon tips which often comes in our windows operating system.

There is a very easy way to get rid of them.

Here is the procedure for disabling these balloon tips:

  1. Go to Start > Run, enter regedit, (start the registry editor)
  2. Search for the key HKEY_CURRENT_USER\Software\Microsoft\Windows\CurrentVersion\Explorer\Advanced
  3. See the DWORD value EnableBalloonTips in the registry editor right pane
    • If it is available, give it hexadecimal value of 0 (zero) by double clicking on it.
    • If you don’t see this key, create a new DWORD value, and name it as EnableBalloonTips. Now give it hexadecimal value of 0 by double clicking on it.

    Stop Those Annoying Balloon Tips in the Notification Area of Windows

  4. Hit the OK button and close the regedit – registry editor.

From now onwards, you won’t get the annoying balloon tips.

Enjoy!